


 英語
英語 スペイン語
スペイン語 ポルトガル語
 フランス語
フランス語 イタリア語
イタリア語 ドイツ語
ドイツ語“「注文が見つかりません」エラー
3件の返信

こんにちは、,
I decided to create and EA based on the SonicR manual trading system (http://www.forexfactory.com/showthread.php?t=114792). Instead of using the same custom indicators they used in the strategy, I decided to make use of MT4 standard indicators (EMA 34 High and Low, CCI Period 63, SMA 10 Close) to replicate the strategy. This is to make sure that I don’t encounter any problems with SQ EA Wizard. I didn’t have any problems with setting up the strategy and trading rules in SQ, but after saving the .mql4 file and back testing in metatrader 4, I always get this “ORDER CANNOT BE FOUND” error in the tester journal and the EA does not place any trades at all. It is so confusing because I went through the strategy and trading rules over and over and over to make sure that there are no mistakes whatsoever and I really cannot see any. So why am I getting these errors?
Can anyone please help me to solve this problem? I really appreciate all your kind gestures.
よろしくお願いします。.
~Michael.
N.B: Since I did not use any custom indicators in creating the strategy, you can replicate it very easily on your computer.
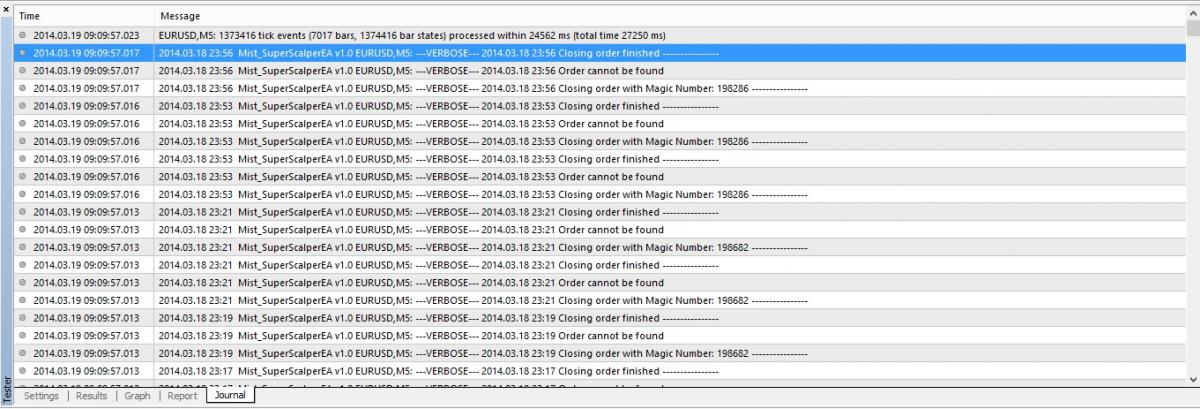 OrderCannotBeFound Error.jpg
0

Odomike,
The issue is that 3 rules cross above/below at the same time in this EA. A good rule of thumb is to only have one rule cross above/below while the other rules are using > or < instead.
I put your indicators on a chart to show why.
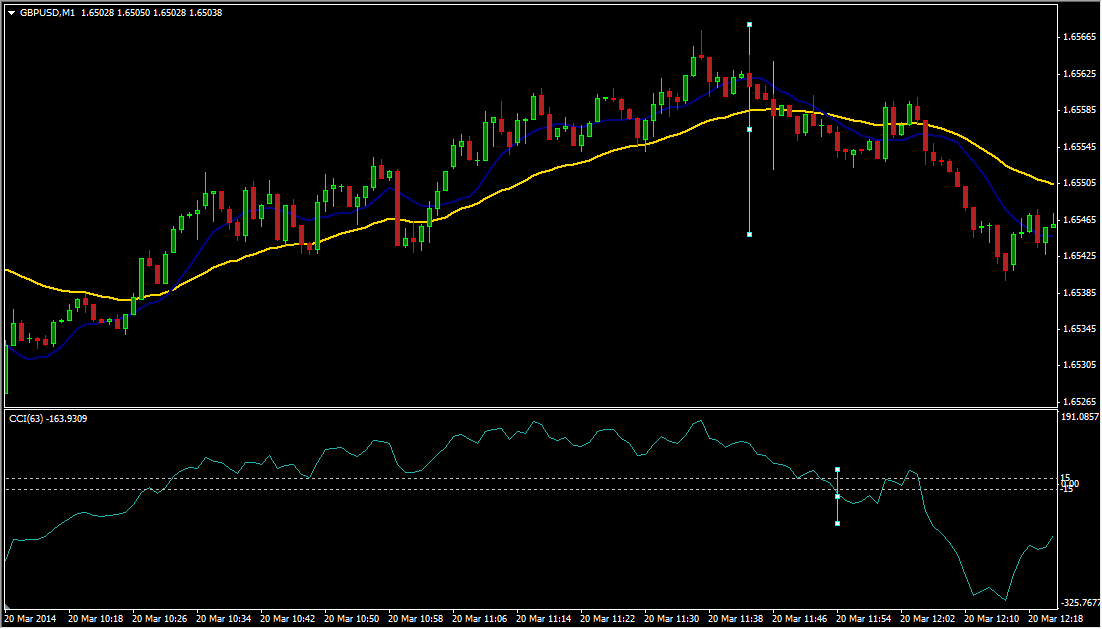 MistSuperScalper.png
The small vertical blue lines shows when the candle crosses below MA1, then MA2, and then when CCI crosses below level 2. There is 6 candles between when the first MA cross and the cross of the CCI. Since not all are crosssing at the exact same bar, that is why you are getting the error message.
So you should use the Cross Below/Above for the last thing that will cross in sequence of the three indicators. For example, if CCI is always the last item to cross, then can use these rules:
長い
CCI crosses above Level 1
Bid > MA1
Bid > MA2
If one indicator is not always the last to cross, meaning they can cross in any order, then you can write the rules to match this. So your rules could be:
長い
((( CCI crosses above Level 1
Bid > MA1
Bid > MA2)
OR (CCI > Level 1
Bid crosses above MA1
Bid > MA2)
OR (CCI > Level 1
Bid > MA1
Bid crosses above MA2)))
お役に立てれば幸いです。.
ステアルノ
0
 gbpjpy-m5-RSIOMA.png
0
Michael,
Good questions.
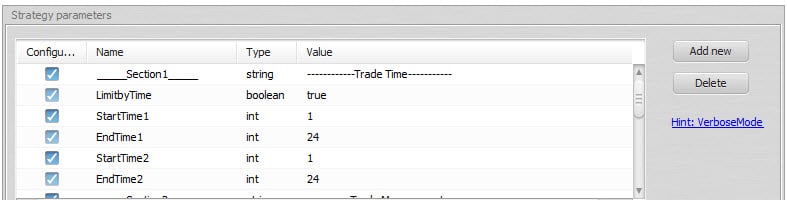
To limit by time, I have attached screenshots of what I personally do. I use hour compared to a variable. I then set the variables in the parameters for which hours I want to trade.
I personally use two sets of hours so that I can have the possibility to trade in two sessions in a day (e.g. London Open and NY Open). I use parameters to set the variables so I can optimize these parameters. You can take this same idea and do many variations that fits best with what you are wanting.
I think your strategy looks okay. Have you tried to backtest it? By the way, I found its always best to first backtest and see that orders are being filled and such. But then I will do a visual backtest to watch with the indicators the EA is going to use on the chart so I can see visually each time the EA is suppose to open or close an order and ensure that it is doing what I want. I can then deduce why it is not and learn how to better tell the computer through these conditions how to do what I want it to.
As for your other questions about when to use >< and when to use cross above/below.
One easy way to remember that I use to keep them differentiated is: crosses above / below, the start of that bar must be on one side and the end of the bar is on the other side.
With ><, it is a lot looser in that choosing this option is just saying that the bar must be above/below the comparison item. It does not matter if went above now, many bars back, has always been above, etc. All that matters is at this moment when the EA is running this rule, it must be greater than or less than (above or below).
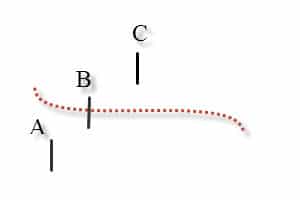
I included a small chart to illustrate with pictures. The red line is the moving average.
If I said Close[1] < Moving Average, then bar 'A' is what I get.
If I said Close[1] > Moving Average, then bar ‘C’ is what I would get.
If I said Close[1] crosses above Moving Average, then bar ‘ B’ is what I get.
Basically, we need to ask ourselves: “At that moment (In the above example, we are using last bar’s close fo that moment, Close[1]), do I want my indicator to be above the close, below the close, or do I want the last bar’s low on one side of the indicator and the high on the other side.
Maybe an example could help. Here is an example of something I learned when using these comparisons:
When using > 30 pips. So, when the order at 29 pips profit and next went to 30 pips, the rule triggered the action to close 50% of the order. On the next bar, the order went to 31 pips profit. Guess what. The order’s profit is still greater than 30 pips. So the action was triggered again and it closed 50% of the order. This continued until there was only a mini lot and it could not close 50% anymore. But I will say, backtesting this was fun because when I would watch the EA visually, it would close orders like a machine gun spray.
So I figured out the cause of this was because I used Profit > 30 pips. And what I did not remember was that 31, 32, 33, 34 pips are all greater than 30. So I used close 50% when Profit Crosses above 30 pips. So this worked, it would go form 29 to 30 pips in one bar, and then close 50% of my order. So now when it went up to 31, 32, 33, 34 pips of profit, it would not close anymore orders.
But the problem with this rule was when the profit would go back down to 25, then back up to 29 and 30 and it would close 50% of the order becaue the rule was satisfied again. (This is unrelated, but how I solved it was when the rule closed 50% of the order, it also set the value of a variable to 2. I then had another condition added to the rule that said do not do a partial close when that variable = 2. This solved my problem and made it only close once)
I hope the above helps.
ステアルノ
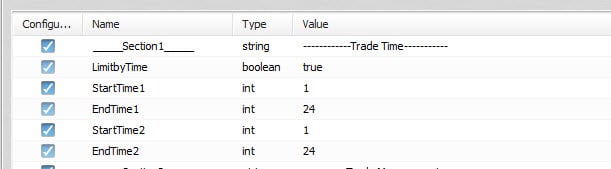 limit by time rules.jpg
 tme parameters.jpg
 4-25-2014 8-15-29 AM.jpg
0
3件の返信を表示中 - 1 - 3件目 (全3件中)